Introduction
In this blogpost I’ll go through the journey I went when I was setting up monitoring with ELK for my website. The task seemed simple - install *beats and tell it to report to my elk stack vm. You’ll see why in my setup it wasn’t as easy as it sounds initially.
The issue
If you recall my network setup had a little issue - I do not own the public IP address where my infrastructure sits. Therefore I’ve done some hacks to make it not matter that much.
Well, that technical debt right there brought me some nasty headaches that you’re about to find out.
When apt install doesn’t work
So I wanted to setup monitoring on the access logs on my website - simple right?
tail -f /var/log/nginx/host.access.log should give me everything I need. This is what I wanted:

All I had to do is install filebeat on the container and I’m done.

Any public service I have goes through the router at home which routes it via a vpn network to reach its destination endpoint.
A simple layer 4 forwarding on my OpenWRT router looks like this:

However, this means that as far as the webserver is concerned, the client accessing it is my router since it is NAT-ting the connection. This means that regardless of your IP, all I get in the logs is the router’s vpn ip:

Well that’s an issue since that information is useless for me.
Let’s log iptables then!
If you’re not familiar with iptables, well you have to change that!
tl;dr; is that iptables is a user-space program that allows you to configure the kernel’s built-in firewall.
iptables tries to match connections and take an appropriate action. One of these actions is LOG which writes a line in the kernel’s log that looks like this:
Mon Oct 8 13:52:12 2018 kern.warn kernel: [512827.190000] IN=br-wan OUT= MAC=12:34:56:78:90:12:34:56:78:90:12:34:56:78 SRC=82.103.122.186 DST=213.191.184.70 LEN=84 TOS=0x00 PREC=0x00 TTL=57 ID=5863 DF PROTO=ICMPTYPE=8 CODE=0 ID=34598 SEQ=1
Cool stuff! - The SRC address is the public address I am after. Let’s shove this into elk!
Logstash-ing OpenWRT’s iptables
Logstash, for those of you who haven’t heard of it, is part of the becomming more and more famous ELK Stack. (I’ll do a blogpost on that at some point)
Logstash is the part that receives logs in any format, parses them to make sense out of them and sends them to Elasticsearch which stores them in a queryable format.
Objective overview
So what I need to do is the following:
1. Create an iptables rule that matches traffic to the website container and log any connections going there.
2. Send the kernel logs over to Logstash.
3. Parse the logs and send them to Elasticsearch.
4. Check result in Kibana
5. Profit!
Let’s get started then
So there’s a little inconvenience with iptables, namely it cannot log to an external file, or at least not easily.
Well that’s fine, I’ll read the logs from the /var/log/kern.log file…
… if there was one!
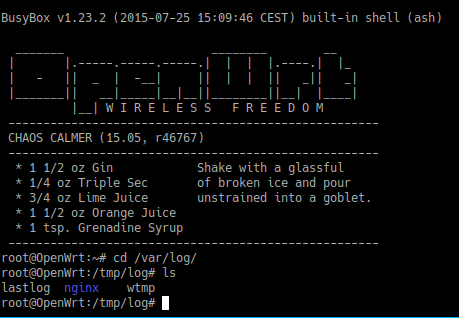
It turns out that there are a few a user-space utilities that are used to read/write to the system log (namely the wtmp file).
Cool stuff, before sending it to Logstash, let’s see what are we actually logging:
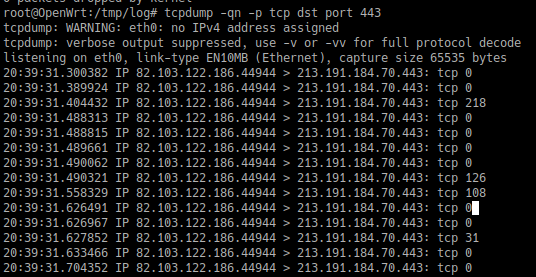
Right, that’s just sending a simple GET request to my website.. . You can see the entire SSL Handshake occuring and what not…
But I don’t want that - I’m interested in something way more simpler - who accessed what and when on my website - I don’t give a damn about the SSL handshake…
Back to the drawing board
Perhaps I’m doing it wrong - I don’t need logging at layer 4 but way higher - at level 7 (If you don’t know what I’m referring, it’s the OSI Layers - a must know).
HTTP is a layer 7 protocol and logging it cannot be done by a router which operates at layer 4 - it needs a higher level application to do that.
So what can log traffic at layer 7?
Nginx can do that! with the proxy_pass directive!
What’s even better - OpenWRT has a nginx package! How better can it get?
So before tinkering with my router (which is kinda critical not to be down - see my previous post) I decided to install the nginx proxy on another server and test it out.
The host I chose was 10.0.20.13. So it basically runs an nginx instance that proxies connections to the 10.2.0.1 machine that runs the website. Here is a picture that illustrates what I want to do:
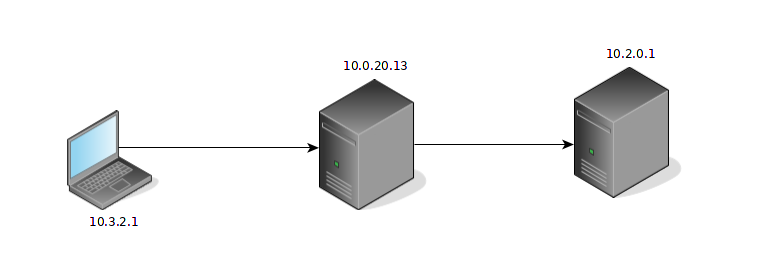
Having this setup, the goal is to see 10.3.2.1 in the access logs on 10.2.0.1.
Installing nginx and configuring (config file shown later) a server block with the proxy_pass directive yields the following in the logs after curl-ing it:

Well, partial success..
On one hand I still managed to access the website which meant that the proxy was working correctly but the web server still logged the proxy’s address.
Luckily, it was a small tweak I had to do in the server settings - here is the guide I followed. Have a read but the tl;dr; is that I needed to change the log format to log the original client’s source ip which is passed as a header from the proxy server.
Add this to the http {} section of the nginx conf:
log_format main '$http_x_forwarded_for - $remote_user [$time_local] '
'"$request" $status $body_bytes_sent "$http_referer" '
'"$http_user_agent"'
Afterwards make use of the specified log format by adding the access_log directive in your server block telling it to use the newly specified log_format:
access_log /var/www/site/logs/access.log main
Adding these changes to the config produces the result I’m after:

Cool stuff! Let’s smash it onto OpenWRT then
Installing packages in OpenWRT is rather simple - there is a package manager which is quite similar to yum and apt - it’s called opkg:
opkg update && opkg install nginx
This will get our nginx instance up and running.
The next thing I did was to edit the config file located at /etc/nginx/nginx.conf and add the proxy_pass directive.:
-- snip --
server {
    listen       80;
    server_name  localhost;

    #charset koi8-r;

    #access_log  logs/host.access.log  main;

    location / {
        root   html;
        index  index.html index.htm;
        proxy_pass http://10.2.0.1
    }

-- snip --
Effectively what happens is everytime a request is made to the / location it is being proxied to http://10.2.0.1.
curl-ing the http port worked fine and I got the right client address in the access logs, however, my site is running https and all the examples of proxy_pass I saw were using http as backend server.
Just before getting worried that this won’t be possible because of the SSL part I saw the nginx documentation on the matter that suggested proxying to https instead of http. Easy enough right?
Now in order to make this work I had to terminate the SSL connection at the OpenWRT nginx and setup a new one with the backend server. To get that going I had to copy the Let’s encrypt certs on the OpenWRT to enable nginx do the SSL termination.
The documentation link I referred earlier specifies some optimisation options to reduce CPU usage and it all seemed perfect.
Well let’s try it out!

WTF?
Goggling the error yields only tutorials on how to recompile the nginx package and I really didn’t want to get into that stuff…
A bit more searching finally answers my question on why it doesn’t work:
To save some space, the OpenWRT team (or however maintains the nginx package for OpenWRT) has decided to not include the SSL module and I get it - why the heck would you use your SOHO router as a web proxy that will also encrypt the traffic to the upstream servers?
Let the recompilation begin then…
I was given no choice - I had to start recompiling stuff if I wanted that to work. I reluctantly followed this guide to figure out how to recompile the nginx package so that it includes the SSL module…
The guide suggested downloading the OpenWRT’s source code, using make menuconfig to add SSL support to the nginx package and compiling it.
The last step was to copy over the nginx binary that would supposedly just work.
It took me like 2 hours or so to finish the compilation process of OpenWRT and then another 40 minutes to compile the nginx package with SSL support…
opkg’s documentation suggested installing .ipk files by running opkg install /path/to/ipk_file.ipk.
This seemed quite handy, unfortunately when I ran that for some reason it just downloaded the official package from OpenWRT’s repositories.
I tried whatever hacks to make it install the ipk I was giving it but it either refused installing the package or just downloaded the official one…
Well screw you then opkg
It turned out that ipk files are just normal tar archives that just need to be extracted at the right location.
The steps to manually install an .ipk file are as follows:
-
Extract the ipk file somewhere:
tar zxpvf /path/to/ipk_file.ipkThis extracts 3 files:
./debian-binary ./data.tar.gz ./control.tar.gz -
data.tar.gz is the one we need. To install it we just need to extract it to
/:cd / tar zxpvf /path/to/data.tar.gzThis produces output similar to:
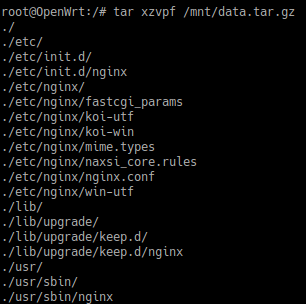
It seemed that all my hopes and dreams would come true as I saw the nginx files being extracted to their correct locations.
The unfortunate part
Alas, running /etc/init.d/nginx start would not start the nginx service for some reason.
After spending some time debugging I tried running the nginx binary itself which just exited with an -ash error that complained that /usr/sbin/nginx file is missing.
And that’s when I’m running the file it says it’s missing … obvious error right?
I couldn’t figure out why this error occured so I was back to square 1…
A new hope - HAProxy?
I got quite frustrated after being so close and eventually failing. Then I decided to do a bit more reading on what exactly I want to acomplish and the tools that I’ll need.
After reading carefully through all the posts and guides on the nginx SSL issue, I noticed something I had missed before:
What is this fancy haproxy thing? I’ve heard it before and I know it is widely used but I hadn’t had the need to implement it in my infrastructure… so far
And it has SSL support and that is quite important to me as it turned out.
Time to HAProxy!
After spending some time getting familiar with this new application it turned out that
HAProxy’s configuration is quite intuitive - the main parts being frontend, backend and listen block that combines the former 2 for brevity.
I’ve found haproxy options manual really useful. Have a glimpse.
As you’d expect the frontend part is what is facing the world and accepts input traffic whereas the backend part is where traffic is being proxied to.
To terminate or not to terminate?
Now there is something important you need to know when dealing with proxies and https traffic - the concept of SSL passthrough and SSL termination. In this blog post both concepts are explained quite well in the context of HAProxy.
Basically, you have to choose whether you want to terminate the ssl connection at the proxy and speak http to the backend server or make the proxy work on a lower level and just pass through tcp packets without knowing what their content is and leave the ssl termination for the backend web server.
Each of these methods has its pros and cons and there is no better choice - it all depends on your needs.
So I had to take back a step and have a second thought on what would best fit my needs:
- I want my backend server to speak https regardless of whether there is a proxy in front of it or not - this would allow me to remove the proxy anytime I want without leaving my server serving plain http content. This means using the proxy in passthrough mode, however
- I also need to add a header to the request to ensure I’m logging the original client’s address and not the proxy’s one - this means ssl termination.
As it happens quite often - my needs required a mix from both options. After reading a couple of guides on SSL termination and SSL passthrough I came up with the following HAProxy config:
listen http_proxy
	bind 213.191.184.70:80 # The public IP address of my router
	mode http # We are proxying http here
	option forwardfor # Add X-FORWARDED-FOR header with the client's ip
	option http-server-close # connection: close for the http session
	reqadd X-Forwared-Proto:\ http
	reqadd X-Forwarded-Port:\ 80
	balance roundrobin # If I add other servers it can load balance between them
	server server01 10.2.0.1:80 # My backend server serving the website

listen https_proxy

	bind 213.191.184.70:443 ssl crt /root/le/live/viktorbarzin.me/viktorbarzin.me.pem # the ssl crt part is important - the file contains both the site's cert with the public key

	# We're proxying HTTP here...
	mode http
	option forwardfor
	option http-server-close
	reqadd X-Forwarded-Proto:\ https
	reqadd X-Forwarded-Port:\ 443

	# Simple HTTP round robin over two servers using the specified
	# source ip 192.168.1.1 .
	balance roundrobin
	server server01 10.2.0.1:443 ssl verify none
It basically forwards both plain http and encrypted https requests to the backend leaving it to decide what to do with them.
When doing the https part, it terminates the SSL connection and establishes a new one with the backend server.
On both occasions it adds X-Forwarded-* headers to let the nginx server on the other side know it is behind a proxy.
A little quirk in HAProxy is that when binding to a SSL port and specifying that it should listen for ssl connections, the certificate you specify needs to contain both the cert and the public key (cat the cert and key files into a pem one and let HAProxy use it - it is described in the link above).
The last thing to do is start the HAProxy service and look at the webserver logs:

Success!
I didn’t need to wait for long to find some dodgy requests coming over all the time…
I didn’t have time to setup *beats services to send the logs over to ELK but from this point on it shouldn’t be too difficult and when I do, I may or may not update this post.
Conclusion
This experience was very satisfying once I got the HAProxy up and running and most importantly doing what I needed it to do. Messing around with the kilobytes of space that was available on my router was also fun - you don’t get deal with so little amount of physical storage every day.
P.S: Check as often as possible that what you are doing is actually whant you need!
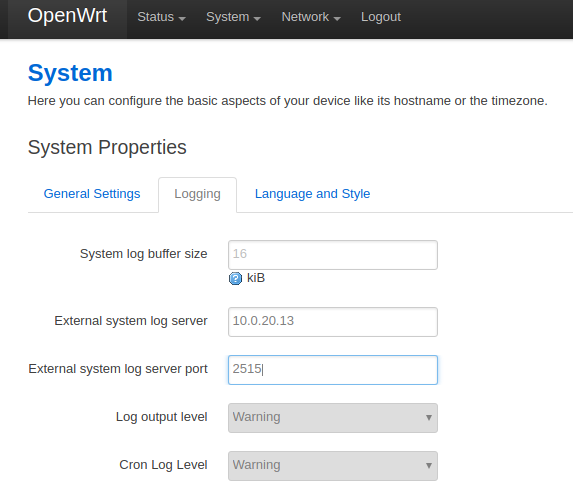
I can’t stress that enough! I did setup OpenWRT to send it’s kernel logs over to Logstash.
If you’re curious you do that by going to System > System > Logging in Openwrt and configure your remote server that is going to accept them:
I had to figure out how Logstash accepts inputs and what all the configuration files do and in what order. Then I wrote those awful grok patterns to parse the iptables logs.
I did all this and spent so much time only to find out that it is logging something I do not need - namely the tcp conversation rather the http I needed.
So yeah, small iterations to check if you’re on the right track. ;)
Till next time.