Introduction
Authentication is hard. Application-level authentication is even tougher and most of the time, when prototyping something, people (unfortunately) don’t think about security and leave wide-open apps listening on the internet.
A simple solution to that could be to use the production web server as an authentication entity that decides whether or not you are allowed to view the upstream application. Both apache and nginx support basic authentication which is essentially a header that your client sends with each request that has your username and password for the system. That’s the simplest mechanism of protection you can enable but it has 2 drawbacks
- You have to manage credentials for each user and per each web server instance. Remember, reusing passwords is a bad idea.
- That may be just me, but I don’t like the idea of sending credentials in clear text with each request to the server.
In my opinion, the less passwords we have to deal with, the more secure a system is. So, what is the alternative?
What are Client-Side Certificates?
Well, the same way we use server side certificates (usually you see them in the “S” part of HTTPS) to prove that the webserver is indeed who they say they are, we can use client-side certificates to prove that the client is who they say they are. Moreover, apart from authentication, you can also do authorization and delegate permissions based on the certificate the client presents.
The best part is that you can have a centralized authority that signs certificate signing requests (CSR, more on this later) that can manage all of that for you and you just have to equip your devices with a certificate file.
This wiki article on TLS does an excellent job of explaining how client certificate authentication works in details.
A Quick reminder on TLS
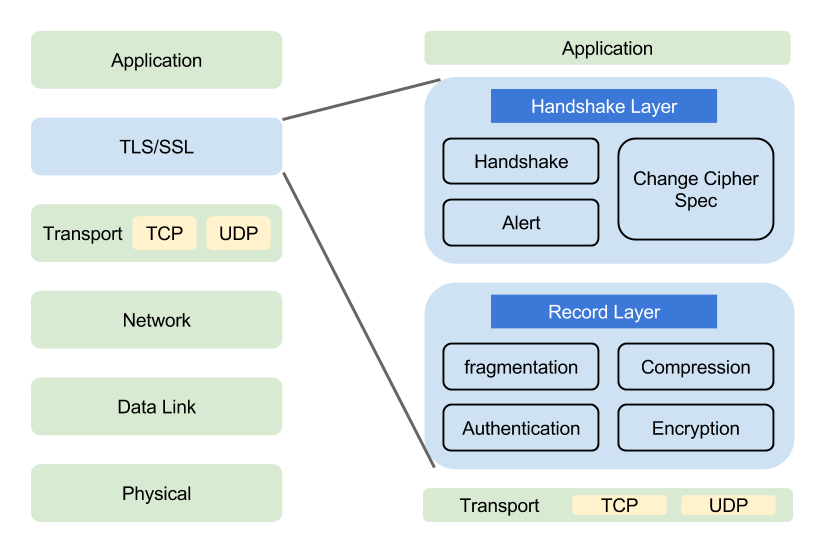
TLS, the successor of SSL is a crypto protocol that lies on top of a transport protocol and provides secure communication over an insecure network. There’s plenty of resource online about TLS that explain it better than I could so I won’t spend time on it. Instead, here is a good visualization on where TLS fits in the OSI model:
TLS resources
https://www.cloudflare.com/learning/ssl/transport-layer-security-tls/
https://en.wikipedia.org/wiki/Transport_Layer_Security
https://tools.ietf.org/html/rfc5246
Learn by doing
For my use case, authentication is enough. I don’t need to do any checks on who a user is - I’ll allow them through as long as they provide a valid client-side certificate so for the rest of the article I’ll share only the “can access” portion of the authentication.
Overview of the process
Before delving into the process, here is what the process looks like:
Server:
- Create a Certificate Authority(CA) Key
- Create a CA Certificate
Client:
- Create a Client Key
- Create a Certificate Signing Request (CSR)
- Send CSR to server to sign it and produce the signed certificate
Server:
- Sign the CSR
- Configure Nginx to require client-side certificates
Creating the Certificate Authority (server)
First, we need to create a key for the CA. This key is used to create the server certificate and sign all certificate signing requests (CSRs) later on. Another way to put it - keep this safe.
openssl genrsa -aes256 -out ca.key 4096
You’ll be prompt for a password to encrypt the key. Make sure you don’t forget it, as you will use this password to decrypt the key which is everytime you want to create a new certificate or sign a CSR.
For those of you who are into crypto, the algorithm of choice (aes265) is the preferred option.
Other available options are -des (des) and -des3 (des3) which are not as modern to put it that way compared to AES.
They are the predecessors of AES.
Here’s a comparison of the 3 and why you should use AES.
Creating a CA Certificate
Now that we have a key, we can create a CA certificate. This is the certificate that will be used to verity client certificates against. It is not a replacement for the typical HTTPS certificate so don’t remove your let’s encrypt certificate!
# sign the certificate for the appropriate time
# 365 days suites my environment
openssl req -new -x509 -days 365 -key ca.key -out ca.crt
You’ll be prompted a few questions. This guide suggests the following:
- Note what you’ve entered for Country, State, Locality, and Organization; you’ll want these to match later when you renew the certificate.
- Do not enter a common name (CN) for the certificate; I’m unsure why, but I had problems when I entered one.
and it works well.
Renewing a certificate is done by creating a new one so depending on how often you can be bothered vs what’s the impact of the certificate being compromised ratio, you may tune the -days parameter on the previous command.
Reviewing the current certificate details can be done with
openssl x509 -in ca.crt -noout -text
Creating a Client Certificate (client)
Similarly to the server certificate, each client will have their own private certificate. This certificate is effectively a password for that particular user to the system so it must be kept private by each client.
Typically, the steps here should be performed by the client. When done, clients will send the CSR to the server (admin) and receive the client certificate back.
Create a User Key
Same command as we used to create the server key:
openssl genrsa -aes256 -out user.key 4096
Create a Certificate Signing Request (CSR)
openssl req -new -key user.key -out user.csr
The answers to the questions should match the CA file of the server we created earlier.
NOTE: Make sure you put Common Name on the CSR!
The common name can be a name of the device/user you are issuing the CSR for. I did not put CN initially and nginx returned a very unhelpful error message so make sure you don’t put a blank CN. Looks like this:
Signing the CSR
After we have created the CSR, we need to send it to the server to sign it. In this step, the server verifies they know the user/device and trust them when they say who they are.
# sign the csr to a certificate with validity of 365 days
openssl x509 -req -days 365 -in user.csr -CA ca.crt -CAkey ca.key -set_serial 01 -out user.crt
Good practices suggest to increment the -set_serial parameter with each signing.
Once the certificate expires, a new one can be created with the same CSR.
Finally, the server sends back the user.crt certificate.
Installing the Client Certificate on a User Device
Now to install the certificate, we need to bundle it with the client keys. The resulting archive must be kept private as anyone who has it, can effectively authenticate as the user holding this certificate.
To bundle it in a PKCS #12 (PFX) run:
openssl pkcs12 -export -out user.pfx -inkey user.key -in user.crt -certfile ca.crt
Note: If a client is creating the archive, they won’t have access to the ca.crt directly, however, they can export it from the TLS connection with the server, as the cert is sent while the TLS negotiation is happening.
When exporting the .pfx, you’ll be prompted for a password.
I recommend setting one simply because you need to transfer the archive to your device in some way and you don’t want that archive to sit not encrypted anywhere.
The .pfx can now be imported into your client browser.
And that’s it!
You now have client authentication without mentioning usernames or passwords and everything happens even before the application has loaded!
The final part to do is to setup our frontend service (nginx or a load-balancing proxy).
P.S: if you don’t like the pfx format, you can easily convert it. Here’s a good cheat sheet - https://knowledge.digicert.com/solution/SO26449.html
Nginx setup
A minimal nginx config that checks for client certificates follows.
There are 2 things to note:
- To keep it brief, I have omitted a lot of optimization options as well as logging options
- You must provide valid TLS certificates (self-signed certs are fine) - client side certificate authentication works only with SSL servers!
    user nginx;
    worker_processes 1;
    pid /var/run/nginx.pid;

    events {
        worker_connections  1024;
    }

    http {
        server {
            server_name nginx;
            listen 443 ssl;
            # make sure those exist!
            ssl_certificate /etc/nginx/fullchain.pem;
            ssl_certificate_key /etc/nginx/privkey.pem;

            # client certificate
            ssl_client_certificate /etc/nginx/client_certs/ca.crt;
            # make verification optional, so we can display a 403 message to those
            # who fail authentication
            ssl_verify_client optional;

            location / {
                # if the client-side certificate failed to authenticate, show a 403
                # message to the client
                if ($ssl_client_verify != SUCCESS) {
                    return 403;
                }
                root /usr/share/nginx/html;
                index index.html;
            }
        }
    }
Demo
To test this config, I ran a docker container and mounting the certificate files:
docker run --rm -p 443:443 --name nginx -v $PWD/nginx.conf:/etc/nginx/nginx.conf -v $PWD/ca.crt:/etc/nginx/client_certs/ca.crt -v $PWD/fullchain.pem:/etc/nginx/fullchain.pem -v $PWD/privkey.pem:/etc/nginx/privkey.pem nginx
This command needs the following files to be present in the current dir:
nginx.conf-nginxconfig. The one above works.ca.crt- the CA server certificate for the client-certificate auth.fullchain.pem,privkey.pem- You HTTPS certificate files.
Simply navigating to https://localhost returns a 403 error:
To import your client certificate in Chrome, go to chrome://settings/certificates and upload your .pfx.
Then when you visit the page again, you will be prompted to provide a client cert like so
Once you select the certificate, you will be allowed to visit nginx’s index
Conclusion
There you have it - client side certificate authentication with Nginx. I hope the information you read was useful. If you have any questions pop them in the comments section below.
If you’re looking for project ideas with this knowledge here’s what I’ve done in my environment - I’ve created a pipeline that takes an app and a Dockerfile to run the app and deploys it behind an nginx and haproxy requiring client certificates. This helps me for hosting sites publicly, but limiting who can view the site e.g a personal project.