Introduction
In the previous post I shared most of the services I have setup at my home lab. Managing all of them is good fun but an issue that emerged with having so many services is visibility - how can a user without any context find out what services I provide?
In this blog post I’m going to share my experience of building a chatbot that helps discovering my services.
I went a bit deeper and made the implementation platform-agnostic meaning that with a simple yaml config you can run the chat bot with your user-defined dialogs.
Designing and implementing this was great fun so let’s get started!
Problem Statement
Design and implement a chatbot bot which is easily accessible by users (i.e does not require any accounts to use) which can provide information about my infrastructure.
Extensions:
- Make the conversation config first class citizen and do not hard code for a single use case
- Allow “write” changes alongside “read-only”, info-based dialogs e.g allow the bot to make changes to the infra and not only serve static data.
Technology review
The simplest solution is to provide a web server which listens for user input and returns responses.
Languages & Frameworks
Recently, I’ve been scratching my itch to write Go so that’s the language of choice there. Furthermore, web services fit quite well the sweat-spot of Go.
Framework-wise, Go has pretty decent http utils including a web server so there isn’t a need to using an external web library which is always nice.
Messaging Medium
An important question we need an answer is what messaging medium will users use to send their messages to the chat bot.
The simplest, implementation-wise option is have a static web page where users can submit their messages. However this would have a lot of complications down the road such as user management, authorization and authentication, spam protection and a lot of the do-it-yourself pitfalls that come along.
Instead, why not use an out-of-the-box messaging platform that almost everyone has - FB/WhatsApp? Furthermore, Messenger’s API allows messaging as a Guest so even if you don’t have a FB account you can still use the chat bot whilst the chatbot will be protected by FB’s spam and abuse policies.
High-level Architecture Overview
Users can interact with the chatbot via my main web site and Messenger’s API. Messenger’s API will then call the chatbot web hook handler which will process the message and return the response up the chain. Something like:
Using this design I do not have to worry about many of the security aspects of opening up a input-accepting page to the internet. Furthermore, I do not need to worry about user interfaces and making sure they appear well on different devices as that is taken care of by the FB apps.
Chatbot Handler Architecture
The chatbot handler will be a web service which handles callbacks from FB APIs, finds the state of conversation for each user and takes an appropriate action.
Implementing the chatbot as a state machine seems like an easy way to go. The design would be something like:
Config
Config should ideally be something a non-tech user can easily create and modify. From modern text formats, I think yaml is the cleanest solution so let’s make the chat bot configurable by yaml.
Requirements
Ideally the chat bot would be reusable - I do not want it to be hard-coded only for my use case. As the title suggests, the goal is to make a chatbot-as-a-service implementation. This means we need some sort of “configuration” to guide the runtime.
Let’s look at what functionality we want:
- Read-only, informative - Respond to common questions i.e what is my email, what services do I have, where can those be found etc.
- Write - Ability to make some changes i.e execute commands. This is a bit more concrete to my infra but the idea is to use the chatbot for instance to add new VPN clients or to add DNS records to my DNS server etc.
Conversation Modelling
Describing conversations can be done using a simple state machine - At each state a user can request an action, actions are transitions in the state machine.
See the image to get an idea of what the current state machine looks like (diagram).
Modelling this logic into the config we will have 3 types of entities:
States- track the “state” of a conversationEvents- messages sent by the user to progress the conversationStatemachine- description of what events lead to what states
Here is a basic example:
states:
- id: &state-initial "Initial" # State ID, unique
  message: "Let's get started"  # Message sent to user once in this state

events:
- id: &event-getstarted "GetStarted" # Event ID, unique
  message: "Get Started!"  # Button, user can click

statemachine:
- name: *event-getstarted  # Event reference
  src:  # List of states from which we can make this event
    - *state-initial
  dst: *state-hello # Once the event is made, state where we end up in
The Write Part
The setup so far works great for the informational part - we can model all sort of conversations where the only input we expect from the user is well defined and static.
Now we need to allow users to do things using the chat bot.
The VPN Use Case
My first use case was adding new clients to my Wireguard VPN - I have setup https://wg.viktorbarzin.me where you can create the boilerplate part for your wireguard config and then I need to assign you an IP address and take your public key.
All of these steps can easily be automated via the bot. In my last post I showed how I’ve made my entire infrastructure-as-a-code which makes automating things much much easier so the infra support is there, I just need something to run the commands.
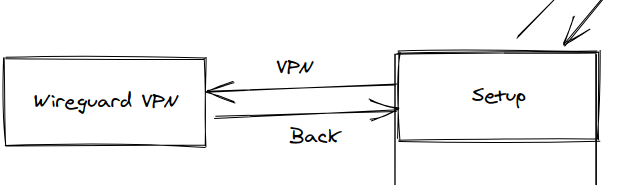
Here is an example flow:
We have the user requesting to create a VPN config, provides their public key and now magic needs to happen:
- The chatbot needs to be able to accept any input (to receive the client’s public key)
- The chatbot needs to be able to seek approval for requests from some other users
- The chatbot needs to be able to access and modify my infrastructure
Accepting any input
So far the chatbot was able to accept only pre-defined input (remember the events). Accepting any input is tricky to model in a state machine as it needs to be deterministic and well defined.
So how do we create a state machine which can accept any input?
Let’s look at a couple of solutions which can help us overcome this difficulty
Special State Solution
One idea is to have SpecialStates - once the user enters these states a hard-coded action is executed.
For example the VPN state could have a magic state id 1 which maps to a hard coded actions needed to create a vpn config. If I want to add more special states i.e have a state to add DNS records, that could have special state id 2 which maps to the logic of adding new DNS records.
The main con of this approach is that it couples the special state actions to the bot and hence to my infrastructure i.e - you cannot run the bot on your infrastructure because the logic for adding VPN clients on your infrastructure most likely differs from mine. Not to mention that each “config” change to these special states need to rebuild and redeploy the whole app…
defaultHandler Solution
Another idea is to have a catch-all command called at each state if a transition is not possible.
For instance you are at the state VPN from which you can only go back:
If the state has a defaultHandler command defined, the bot can execute that with whatever input we had.
The defaultHandler command will be defined in the yaml config and thus keep the bot decoupled from the logic inside of the defaultHandler.
The question that comes now is what does the defaultHandler command look like?
It can’t be a binary as it has to be inside the config file.
It can’t be code as it has to be compiled along with the chat bot binary which is not necessary the case.
Why not a bash script?
Bash fits somewhere in between programming and human readable code and is available in almost all environments.
It has another important feature - it is Turing complete meaning you can express anything with bash making it the perfect choice for a defaultHandler executor.
The main flaw of this approach is that you probably need to write another CLI which the chatbot will call to do its thing but that’s fine because we keep the chatbot decoupled from the logic it is executing which is exactly our goal!
Users And Permissions
The flow diagram above describes some actors - user and admin - users are something the chatbot has no notion of so far. If we want some sort of permission system where commands need approval we will most certainly need a user entity.
Let’s define some entities:
Command- this is a shell command that the chatbot can executePermission- each command should have a list of requiredPermissions - if a user has all the required permissions they can execute the command- Speaking of users,
Useris another entity we will need - it will model the users using the chatbot. Each user can have a different set of permissions and hence different roles. Roles are a set of permissions - eachUsercan have aRolewithin our system which gives them some permissions i.e adminRolecan have the permission to execute shell commands or the vpn-adminRolecan have the permission to create VPN configs.- Finally
Groups are groups of users - this is mostly for convenience - I may have 1 user id when I chat with the bot from Messenger, but another when I do from WhatsApp and still I want the bot to recognize me as the same user. This slightly differs with the standard notion of groups but is useful in this case.
If you are a visual person like myself, the following illustration may help to understand my idea:
Starting from left-to-right, a User has 0 or more groups.
A User and a Group can have 0 or more Roles.
Each Role can have 0 or more Permissions which allow the execution of Commands.
Each Command has 0 or more Permissions needed to execute this command.
I call this design Poor-man’s RBAC, inspired by Kubernetes’ RBAC model. It makes it very easy to define permissions over entities and makes answering questions such as “Can user X execute command Y?” very easy. The system is additive meaning that by default users have no permissions and with each group they join they acquire more roles.
Implementation
If you want to take a go of implementing the design described so far, stop reading now. The rest of the article explains some of the more interesting points of implementing the aforementioned design.
Receiving messages
Starting from the top-down, we need to create an FB page to which we can attach the chatbot.
I created Viktor Web Services for this purpose - you can message the page to interact with my bot.
You need to go to https://developers.facebook.com, create a new App and link your page to it. Facebook has some great docs documenting the entire process so I’ll skip this part.
Once you add the Messenger product to your app, you need to setup webhooks for messages (raw messages) and messaging postbacks (users clicking on buttons). It will look something like
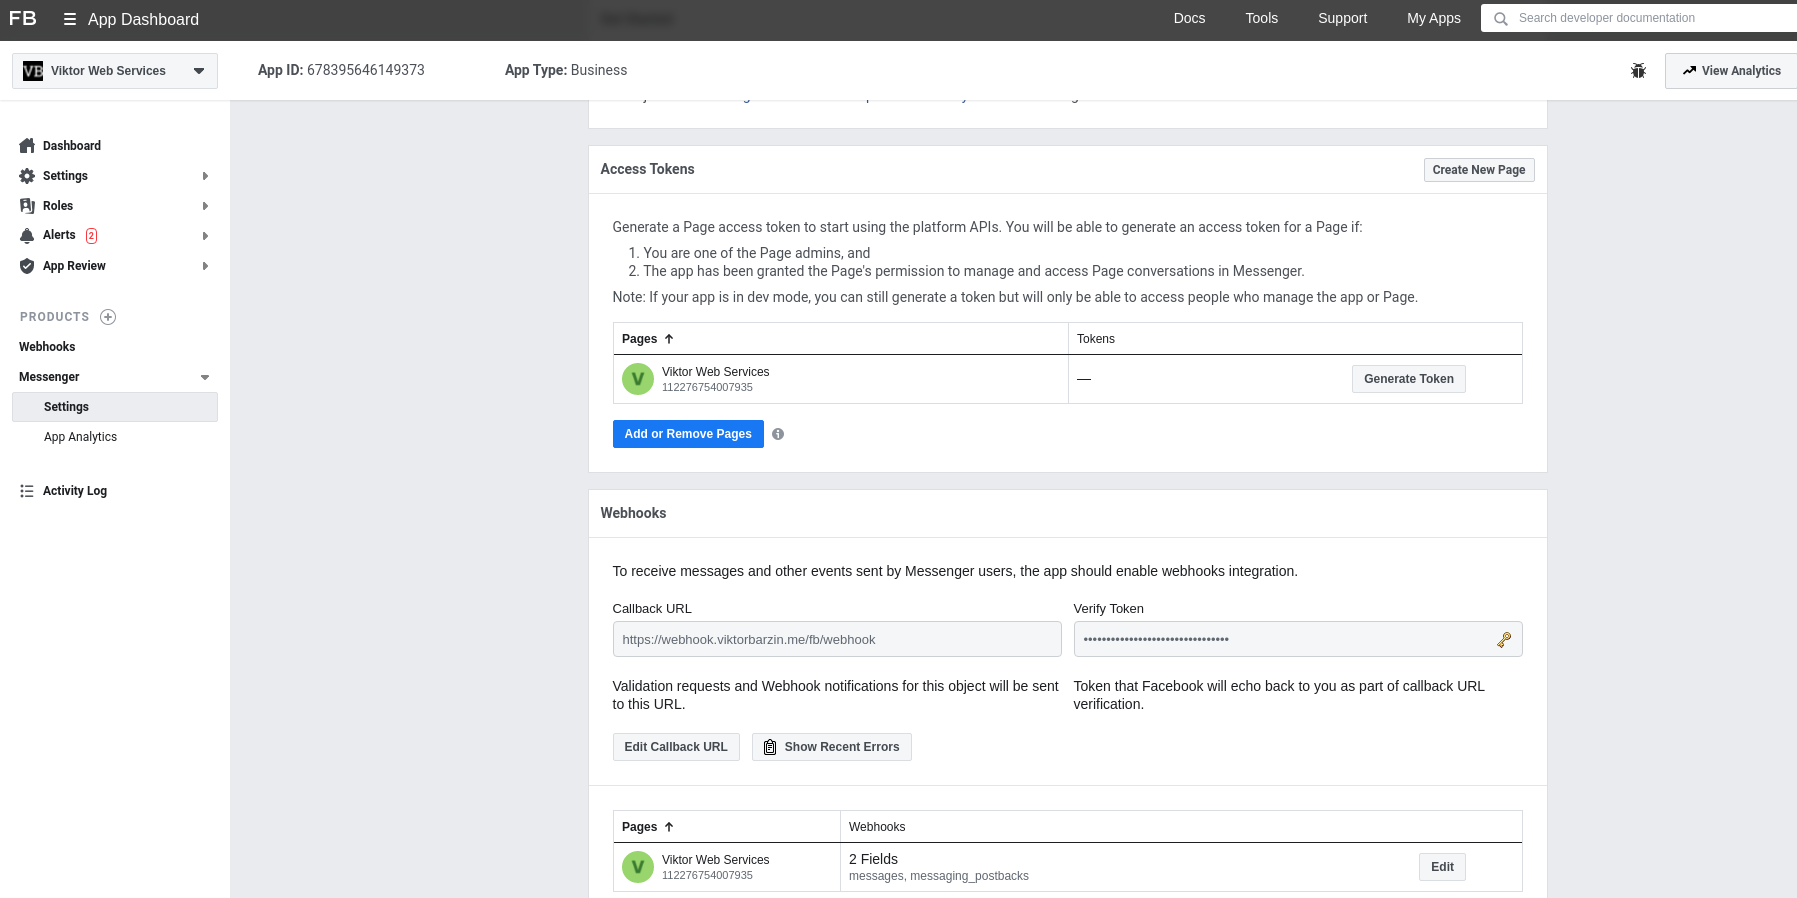
Processing webhooks
All messages come in the form of http requests sent by FB to our web handler.
Authenticity Check
Each message will have a signature, signed by a symmetric key which is configured in the FB app. You should definitely verify the signature otherwise you could be processing unauthorized messages from unknown sources.
Here is an example of how to verify the [HMAC](https://en.wikipedia.org/wiki/HMAC#:~:text=In%20cryptography%2C%20an%20HMAC%20(sometimes,and%20a%20secret%20cryptographic%20key.) from an http object in Golang:
func ValidSignature(r *http.Request) (bool, string) {
	var buf bytes.Buffer
	cloned := io.TeeReader(r.Body, &buf)
	signatureValues, ok := r.Header["X-Hub-Signature"]
	if !ok {
		return false, "'X-Hub-Signature' header is not set"
	}
	if len(signatureValues) == 0 || len(signatureValues) > 1 {
		return false, fmt.Sprintf("'X-Hub-Signature' must have exactly 1 value. got %d values", len(signatureValues))
	}
	signature := signatureValues[0]
	if len(signature) < 5 || signature[0:5] != "sha1=" {
		return false, fmt.Sprintf("invalid format of signature. expected: 'sha1=SIGNATURE_VALUE', received %s", signature)
	}
	signature = signature[5:]

	postData, err := ioutil.ReadAll(cloned)
	r.Body = ioutil.NopCloser(&buf)
	if err != nil {
		return false, "failed to get body for which to calculate hmac"
	}
	h := hmac.New(sha1.New, []byte(AppSecret))
	h.Write([]byte(postData))

	expected := hex.EncodeToString(h.Sum(nil))
	matching := expected == signature
	if !matching {
		return false, fmt.Sprintf("signature are not matching. got signature %s", signature)
	}
	return true, "signatures are matching"
}
Once we have verified the message is authentic, we can start processing it.
Raw Messages vs Postback Messages
The message payload is json which has a lot of meta information, part of which is the actual message the user has sent.
We want our chatbot to handle both raw messages (users inputting text) and post back messages (users clicking on buttons provided by the bot), we want the chatbot to be able to handle both types of messages.
For simplicity, I’ve merged that logic into a single func which just takes the sender ID and the message they’ve sent.
Note: FB respects privacy and does not send the actual user id, but a fake, page-specific user id which cannot be linked to the sender’s real FB id.
Note 2: Mapping both postback messages and raw messages into 1 can cause collisions but I’m okay with that
Processing All Messages
Processing messages is done in few steps:
- From sender id, find their conversation state, aka their state machine - this is done with a map mapping user id to state machines aka
FSM. I’ve created a wrapper aroundfsm.FSM(github.com/looplab/fsm), which also stores some useful information such as all states loaded from the config, all events and the transitions. - From the current state of the conversation, try to make a move in the state machine using the next message
- If that’s possible, great, make the move and send back success to user
- If moving is not possible the chatbot needs to see whether there is a
defaultHandlerdefined.- If there is one, can the current user execute it?
- If yes, execute the command and return its status
- If user cannot execute the
defaultHandlerbecause of lack of permissions, we need to notify them. Furthermore, the chatbot needs to find a user which can execute the command and request permission to run it for the user.- I implemented seeking approval in the most basic and simplistic way - if a user X cannot execute command Y, for each user defined in the config who can execute command Y, send them a message saying “User X wants to execute command Y with input Z”, then the “admin” can decide whether or not to approve it. Approving/Rejecting commands is implemented in a weird way - explore the code to see why :P
- If there is one, can the current user execute it?
Executing defaultHandler
As previously mentioned, the defaultHandler is a catch-all command that is executed if a move cannot be performed from a given state.
It is a normal Command as defined earlier and utilizes the existing RBAC-like permission model.
The main goal is to allow people who want to setup their bot in their infrastructure to allow it to execute commands. I’ve written a small CLI for my infrastructure which allows me to do certain write changes such as adding new Wireguard clients.
In my chatbot config I am calling this CLI, performing some sanity checks on the input beforehand. This allows my chatbot to execute any command in my infra without coupling it - everything is abstracted via the config file.
Here is what is the command in my config which adds new VPN clients look like
commands:
- &cmd-setup-wireguard
  id: "setup_wireguard"
  cmd: |
    set -e

    name=$(echo $line | awk '{print $1}')
    if [ -z "$name" ]; then
      echo "VPN config name must not be empty"
      exit 1
    fi
    key=$(echo $line | awk '{print $2}')
    if [ -z "$key" ]; then
      echo "VPN config key must not be empty"
      exit 1
    fi
    # infra_cli logs to stderr
    cmd="infra_cli -result-only -use-case vpn -vpn-client-name $name -vpn-pub-key $key"
    set +e
    ip=$($cmd 2>&1)
    set -e
    if [ $? -ne 0 ]; then
      echo "Error occurred while adding your config: $ip"
      exit 1
    fi

    cat << EOF
    Successfully added vpn config for $name!

    Allocated IP address is: $ip

    In your wireguard config, under the [Interface] section, update the "Address" key to "$ip" (without the quotes).
    Example:

    [Interface]
    Address = $ip
    PrivateKey = ...

    Once you set this, you should be good to go.
    Feel free to contact me if you are having connectivity issues.

    P.S: You can choose which subnets you want to route through the Wireguard tunnel.
    This can be tweaked in the [Peer] section, under "AllowedIPs" key. "0.0.0.0/0" mean the entire internet.
    If you want to access only my infra services you can set it to "10.0.0.0/8".
    EOF
  prettyName: "Setup Wireguard"
  permissions:
    - *perm-run-shell-commands
  approvedBy: *admin-role
  showCmdOutput: true
It is a very simple shell script which calls my infra_cli which does the heavy lifting - in your case you can make your own infra_cli which does things differently and the chatbot would still be working.
P.S: Not adding my full config here to keep things brief (link to my full config).
Config format
The config format is as follows:
1 yaml file which contains 2 yaml documents (split with ---).
The first (order doesn’t matter) document specifies the RBAC config. It’s format is:
permissions:
- &perm-run-shell-commands
  idstr: "some unique id"

roles:
- &admin-role
  id: "admin"
  permissions:
    - *perm-run-shell-commands

commands:
- &cmd-setup-wireguard
  id: "some unique command id"
  cmd: "some shell script; can use '$line' to refer to input passed from the user"
  prettyName: "Pretty name for the command"
  permissions:
    - *perm-run-shell-commands
  approvedBy: *admin-role  # Role which can approve this command
  showCmdOutput: true  # Whether or not to show the command output to the user

groups:
- &viktor-group
  name: "viktor"
  roles:
  - *admin-role

users:
# - id: "__guest"  # default guest user id
#   name: "Guest user"
- &viktor-fbid
  id: "3804650372987546" # my fb page-specific id
  # roles:
  # - *admin-role  # adding this role is not necessary is it is inherited from the group
  name: "Viktor-fb"
  groups:
    - *viktor-group
Obviously, you can add more permissions, roles, commands, groups and users - they are all lists.
The second yaml document is the states and events description. Here is what this looks like:
states:
- id: &state-initial "Initial"  # Some state id
  message: "Let's get started"  # This is the message the user receives when entering the state

events:
- id: &event-back "Back"  # This is the event to go back
  message: "Back"  # This is shown to the user as a button in the chat
  orderID: 95  # This is used for ordering multiple available transitions

statemachine:
- name: *event-getstarted  # Refer to the transition
  src:
    - *state-initial  # from which states can you make this transition
  dst: *state-hello  # where does the user end up after executing the transition
Same goes here - to expand to bot just add more states, events and their link in the statemachine.
How do I setup the chatbot as a service?
At this point you should be like

but how do I actually run this thing for my own FB page, in my own website, for my own infra?
Fair question, let me show you how I have set it up and how what you need to do to set it up for your use case. I have a terraform module which run this in my Kubernetes cluster. The things you need:
-
docker image - viktorbarzin/webhook-handler
-
environment variables so that the bot can connect with your FB page:
FB_APP_SECRET- can be found in the developer settings in your FB appFB_VERIFY_TOKEN- same as above; used by FB as part of the “challenge” step so both parties can verify each otherCONFIG- this is optional, can be passed through the-cflag - points to the file location of the yaml config.
And that’s it! You can now use the chatbot for your own purposes. In my opinion the config is simple enough yet powerful enough to allow you to create any sort of conversation, backed by actions.
P.S: On code quality, this is not my best project - I’m writing it in my spare time for fun and is nowhere near production-grade software. Accept all of my choices as “easiest-and-fastest”, not necessarily the best. Not to mention I’m too lazy to write tests and I want to make surprises to my future self :-)
Conclusion
Thank you for making it to the end of this long article!
I hope that you found it interesting and inspiring for you to go out and make your own chatbot or even reuse mine. I’d be happy to hear your thoughts in the comments or in the issues in Github.
Till next time!