Introduction
In my previous post I shared most of the services I am running at home. In this post I will share the way they are setup, including code sources, some of the challenges I met and how I solved them.
Enjoy :)
Problem statement
Design a system that is:
- easily extensible (easy to add new services)
- scalable (can handle increase in usage)
- highly available (where the number of single point of failures is close to 0)
- easily maintainable (a single person can support it without dedicating a lot of time)
- moderately secure (having the ability to easily control who can talk to who)
- reliable (being able to trust it to properly function and store data)
The system must allow for easy disaster recovery with minimal downtime and recovery effort, ideally with no data loss.
Constraints
The physical constraints are:
- 1 ISP provider
- 1 border router
- 1 physical server - Dell R730
- Intel(R) Xeon(R) CPU E5-2620 v3 @ 2.40GHz (6 cores, 12 hyper threads)
- 80 GB memory
- 9 NICs, 1Gbps each
- ~5 public IPv4 addresses, /60 IPv6 prefix
Let’s build ourselves a self-hosted cloud!
Virtualization Solutions
Having 1 physical machine almost certainly means that some sort of virtualization would be required.
Popular production virtualization technologies include:
- Xen/Citrix Server
- Microsoft HyperV
- VMWare vSphere
Xen Server
Xen sounds like a great solution - it’s FOSS and linux based.
Unfortunately I have not spend enough time exploring it and initially I had gone with a different provider so you can call it “legacy” reasons of me not picking Xen.
Microsoft HyperV
Microsoft’s HyperV is a great solution for Windows-based environments. Some of the things I don’t like:
- Licenses and fees even for educational purposes
- Windows and .NET oriented which is not the direction I’m heading
- Windows
VMWare vSphere
VMWare’s vSphere is a great well-rounded solution for virtualization, coupled with a comprehensive UI. There is no Windows bias and it is quite easy to get started as opposed to KVM-based solutions.
There are also educational enterprise licenses which have no expiration date (thanks VMWare!) so quite easy to learn and explore without having to pay thousands in licenses so long as what you are doing is non-commercial.
Some things I like:
- Abundance of materials
- Comprehensive documentation, perhaps a bit overwhelming
- Powerful UI
Some things I don’t like:
- As long as it works it’s great, anytime anything breaks it’s usually a pain to understand and fix
And the virtualization choice is:
VMWare
There’s lots of tutorials on how to install ESXi and it’s not that exciting so skipping it here.
Application Runtime
Installing web servers and application software on bare VMs is quite an old-fashioned and would definitely be not satisfy our high availability and low operational cost requirements.
Containers prove to be a great solution and are the natural evolution of VMs. With the cloud era it would be madness to choose anything else but Kubernetes for container orchestration.
Network Topology
We have a hypervisor that’s ready to run VMs. We know that we will be using Kubernetes to run all services.
It’s time to come up with a network design.
Network management is hard so let’s try to keep it as simple as possible.
Requirements
- VLAN for management VMs
- this includes VMs such as vCenter which should be separated from the cluster’s network
- VLAN for Kubernetes cluster nodes
- Firewall appliance to manage and enforce cross-vlan and external traffic policies
Following these requirements, a simple solution like the following diagram seems to work well:
Diagram Explanation
Border router
- TP-Link TL-WDR4300 v1 running latest OpenWRT firmware
- LAN DHCP server, assigning both v4 and v6 addresses to clients
- Main firewall for clients on LAN
Interesting responsibilities:
- Assigns local v4 and global v6 addresses
- Also “translates” v6 to v4 addresses so you can reach the router on v6 and it will forward your request to the v4 backend
- This is done using this simple socat script which is running as a cronjob:
#!/bin/sh

global_ip='2a00:4802:360::136'

if curl --connect-timeout 2 [$global_ip] > /dev/null; then
      echo 'Socket open'
else
      echo 'Socket closet, opening...'
      # Web
      socat tcp6-listen:443,fork,reuseaddr,bind=[$global_ip] tcp:10.0.20.200:443 &
      socat tcp6-listen:80,fork,reuseaddr,bind=[$global_ip] tcp:10.0.20.200:80 &

      # DNS
      socat udp6-listen:53,fork,reuseaddr,bind=[$global_ip] udp:10.0.20.1:53 &
fi
- This is done using this simple socat script which is running as a cronjob:
Distributed vSwitch dWAN
- Switch with uplink mapped to host NIC
- VMs connected to it have direct connectivity to upstream network
- The only VM we want connected here from out “datacenter” is the PFsense appliance. Here is the topology of this switch:
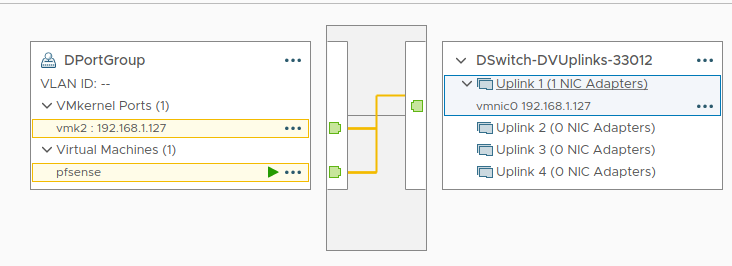
- Note there is 1 physical NIC connected to it which gets its address from the border router’s dhcp server.
Distributed vSwitch dLAN
- Switch with no uplinks, provides intra-cluster connectivity
- Manages 2 VLANS
- Management VMs VLAN
- Hosts VMs which are related to infra management such as the vCenter appliance
- Cluster VLAN
- Host VMs which are within the Kubernetes cluster - both master and worker nodes
- Management VMs VLAN
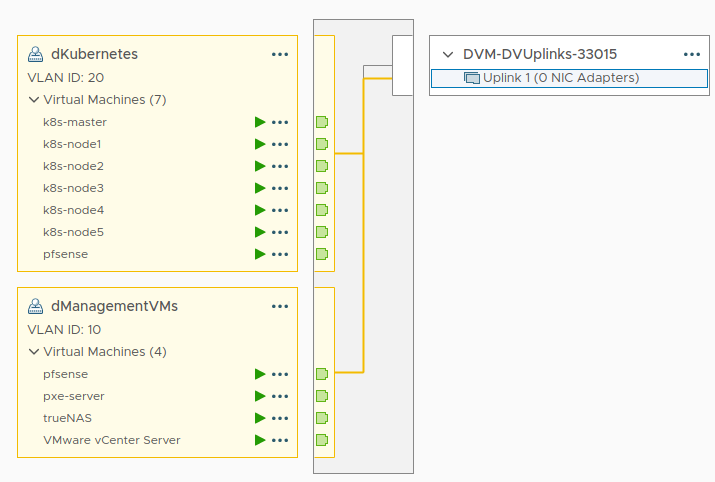
- Note there are no physical NICs attached to this switch. It is the PFsense appliance’s job to act as DHCP and advertise to clients to send their traffic through it
PFSense VM
- Main firewall for “datacenter” traffic
- Firewall, DHCP and uplink for all VMs
Interesting responsibilities:
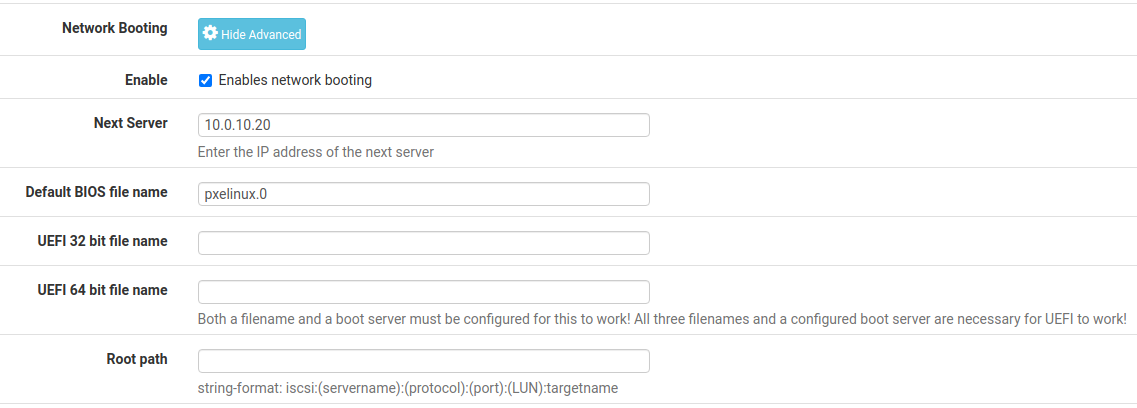
- Beyond the simple firewalling and DHCP functionalities, the PfSense appliance instructs new VMs to PXE boot using the PXE Server
- The PXE config for the DHCP is quite simple:
vCenter Appliance
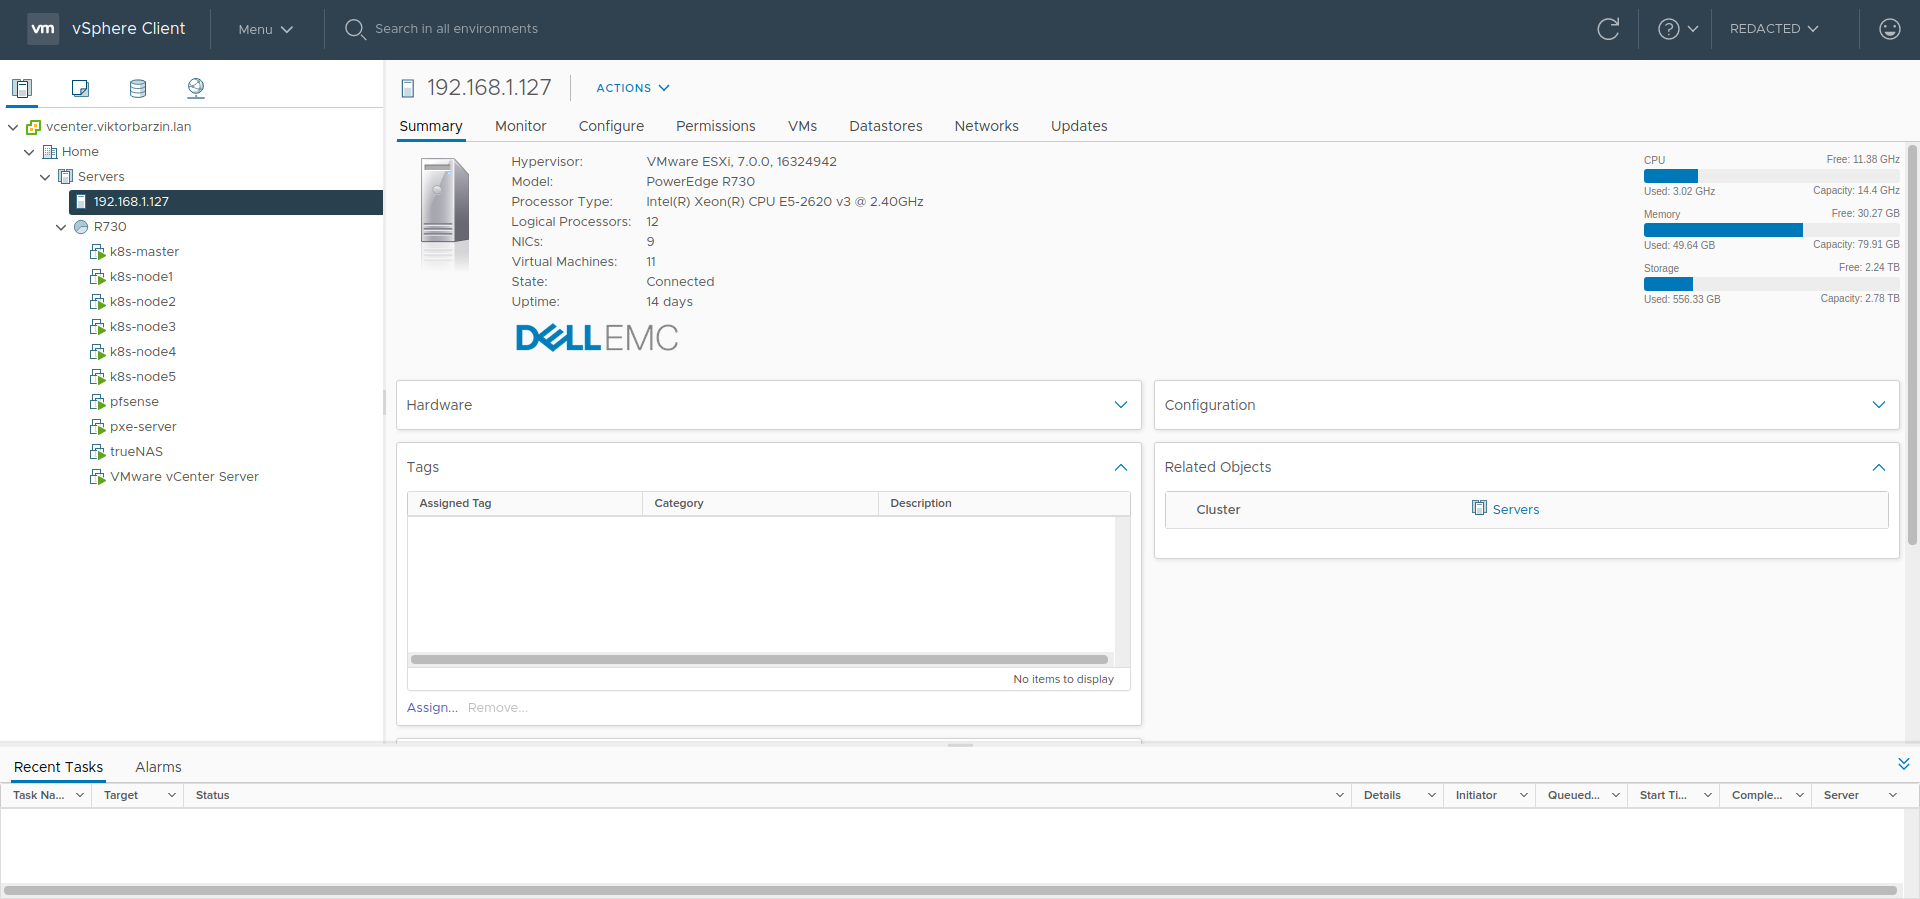
- Manages the ESXi host
- Responsible for the VM lifecycle management
PXE Server
- Automatic provisioning of newly created VMs
- When provisioning new machines, they are freshly installed as opposed to using a pre-installed image
- The PXE server stores the base image for each Kubernetes nodes along with a kick start file that has all answers to the installation prompts
Here is how a newly created VM would boot off the network and auto install itself:
Currently my PXE server is still using ansible so I don’t yet have a terraform module for it. The important bits are the pxe config file which creates the boot menu for the client:
# --- BEGIN bootstrap settings ---
DEFAULT vesamenu.c32
TIMEOUT 100
PROMPT 0
MENU INCLUDE pxelinux.cfg/pxe.conf
NOESCAPE 1

LABEL BootLocal
    localboot 0
    TEXT HELP
    Boot to local hard disk
    ENDTEXT
# --- END bootstrap settings ---
# --- BEGIN Ubuntu20.04 ---
MENU TITLE Ubuntu20.04
  LABEL "Ubuntu20.04"
          MENU DEFAULT # Set as default option. Last one is applied
          MENU LABEL Ubuntu20.04
          KERNEL Ubuntu20.04/linux
          APPEND method=nfs://pxe.viktorbarzin.lan/tftpboot/Ubuntu20.04 initrd=Ubuntu20.04/initrd.gz ks=nfs:pxe.viktorbarzin.lan:/tftpboot/ks.cfg hostname=ubuntu2004
MENU END
# --- END Ubuntu20.04 ---
and the ks.cfg kickstart file which allows automatic install:
# --- BEGIN Ansible-generated config
platform=x86

#System language
lang en_US
#Language modules to install
langsupport en_US
#System keyboard
keyboard us
#System mouse
mouse
#System timezone
timezone Europe/Sofia
#Root password
rootpw --disabled
#Initial user
user wizard --fullname wizard --iscrypted --password {{ shadow-style-hashed password }}
#Reboot after installation
reboot
#Use text mode install
text
#Install OS instead of upgrade
install
#Use CDROM installation media
cdrom
#System bootloader configuration
bootloader --location=mbr
#Clear the Master Boot Record
zerombr yes
#Partition clearing information
clearpart --all --initlabel
#Disk partitioning information
part / --fstype ext4 --size 1 --grow
# Debian installer "Are you sure you want to write changes to disk" question
preseed partman-lvm/confirm_nooverwrite boolean true
#System authorization infomation
auth  --useshadow
#Firewall configuration
firewall --disabled --ssh
#Do not configure the X Window System
skipx
# Packages to install
%packages
@ openssh-server
open-vm-tools
%post --interpreter=/bin/bash
ln -s /usr/bin/python3 /usr/bin/python
# Import ssh key
mkdir -p -m 0755 /home/wizard/.ssh/
cat <<EOF > /home/wizard/.ssh/authorized_keys

MY_PUBLIC_SSH_KEY

EOF
# Set permissions
chmod 0644 /home/wizard/.ssh/authorized_keys
# Set python3 as default python interpreter
rm $(which python)
ln -s $(which python3) /usr/bin/python
%end
# --- END Ansible-generated config
It takes around 10 minutes on my hardware to go from empty VM to a installed, ready-to-use one.
TrueNAS
- TrueNAS is my temporary solution for storage
- It provides NFS, iSCSI, SMB, SSHFS and lots of other interfaces to share data
- I (temporarily) gave up on setting up distributed storage solutions within the Kubernetes cluster after I cried a lot with CephFS
- It currently stores all data such as mail server data, hackmd documents, privatebin and any service that needs any sort of persistence.
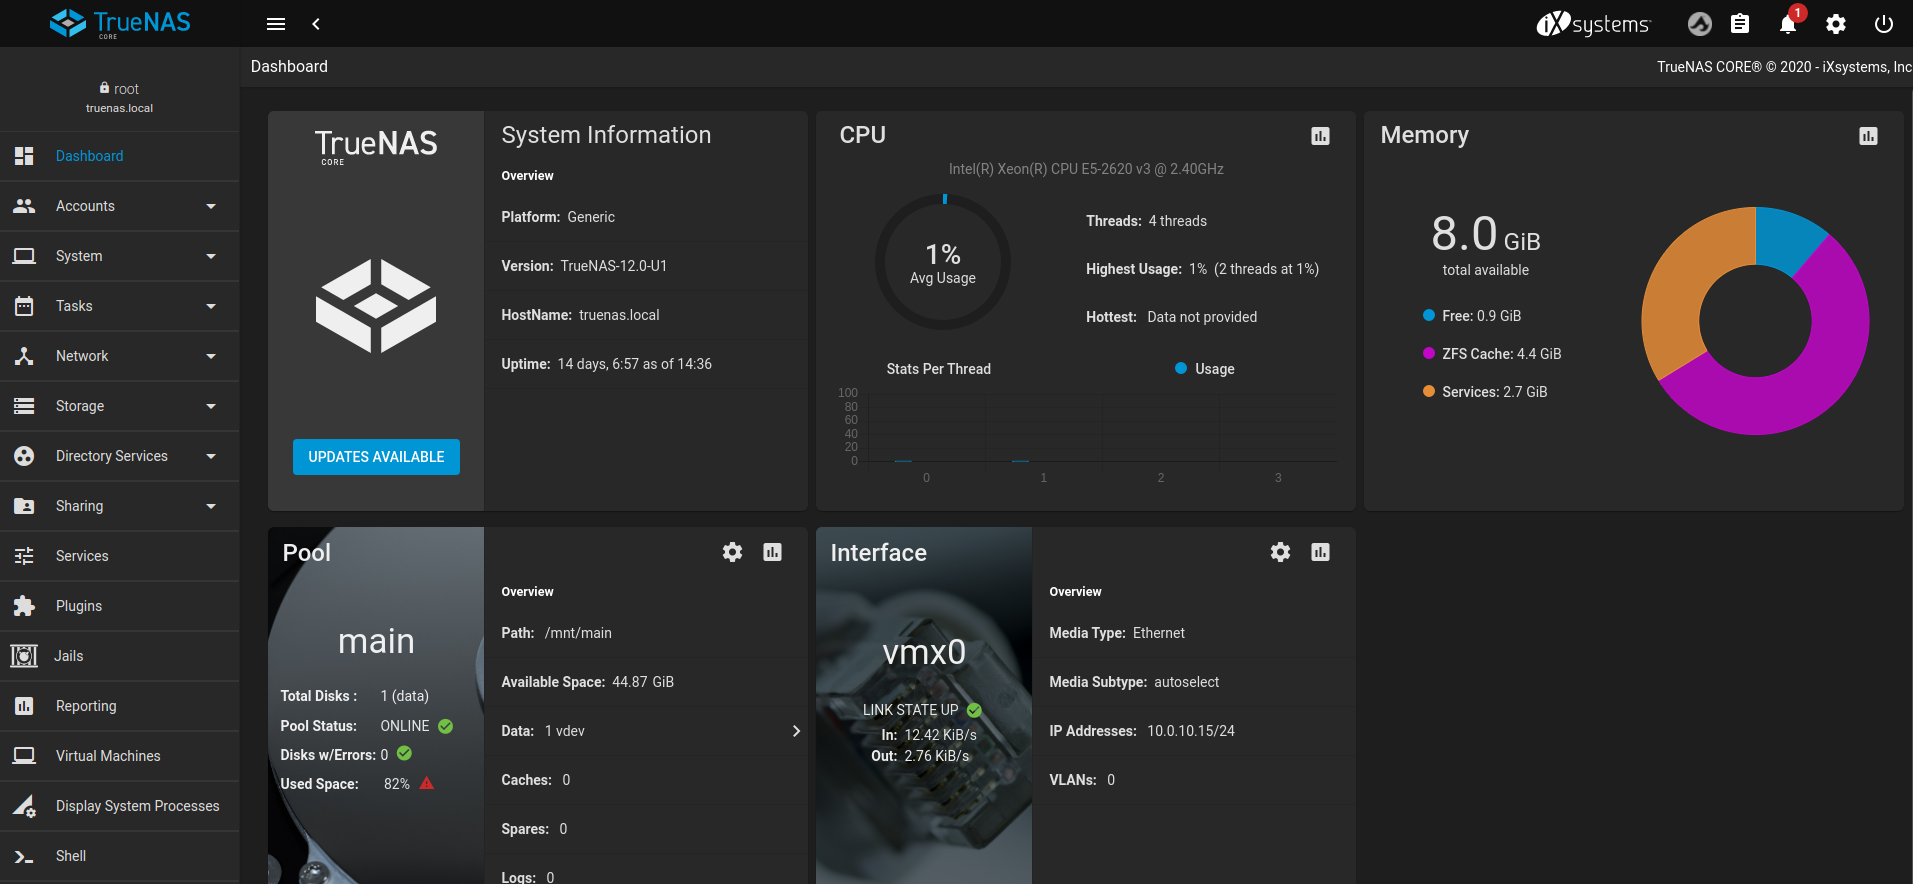
Quite happy with TrueNAS so far.
Kubernetes VMs
Finally the Kubernetes cluster nodes.
- Vanilla ubuntu server installation with container tools (docker, kubelet, kubeadm) installed, provisioned with ansible and created/joined the Kubernetes cluster managed by kubeadm.
Application stack
If we assume all of the above is the “hardware” part of the infrastructure, let’s see what challenges are there facing the software part.
We have a bunch of services running inside a Kubernetes cluster but how would traffic reach the cluster in the first place?
Let’s have a look at the network diagram at a more software-y view point:
Network from a software point of view
A question that is raised - where would all traffic be mapped to? In any Cloud Provider service (GCP, AWS, Azure) you will get an IP address automatically for each service. Well, since we are talking about self-hosted cloud we do not have the luxury of someone setting up our IP addresses for us.
So, let’s look at what options we have:
Option 1: we can forward all traffic to a master or worker node which would then use kubeproxy to forward traffic accordingly
Problem: What happens if this node goes down? Service may be available but will not be reachable so this option is not great
Option 2: we can forward the traffic to a virtual IP
Each node would constantly communicate to each other to elect a “leader” which will allow him to “hold” the virtual IP and communicate that with the upstream route via either gratuitous ARP or via BGP. If the “master” node stops responding to pings from other nodes, they elect a new master and update the upstream router.
Welcome metallb
metallb is a network load balancer which can do just that!
Here is a simple metallb config that uses ARP to manage an address pool:
address-pools:
- name: default
  protocol: layer2
  addresses:
  - 10.0.20.200-10.0.20.220
Here is my terraform module for that uses this config along with a daemon set to run the speaker deamon on each node -
https://github.com/ViktorBarzin/infra/blob/master/modules/kubernetes/metallb/main.tf
Too many IPs…
Great, we can have virtual IPs mapped to dynamically-assigned physical hosts which eliminates the single point of failure on the node level.
Now comes the question how to have a single IP address for all services - if we go with the 1-ip-per-service approach it would be a nightmare to remember which IP address belongs to which service.
Hello Ingress
Welcome Ingress controllers! Ingress controllers can be seen as a service that stands in front of other services:
The ingress controller takes 1 “external” IP address from the network load balancer and then does layer 7 routing decisions.
For instance, routing http traffic is done based on the Host header.
Here is a simple config for an ingress resource:
apiVersion: networking.k8s.io/v1
kind: Ingress
metadata:
  namespace: website
  name: blog
spec:
  rules:
  - host: www.viktorbarzin.me
    http:
      paths:
      - path: /
         backend:
          service:
            name: blog
            port:
              number: 80
  tls:
  - hosts:
    - www.viktorbarzin.me
    secretName: tls-secret
This resource instructs the ingress controller to forward all requests with www.viktorbarzin.me Host header to the blog service.
The service itself is using the default and simplest ClusterIP type which exposes it only to intra-cluster traffic.
Furthermore, by passing the tls parameter along with a secret name, the ingress controller can do TLS termination which is quite neat!
IP Sharing
Okay, http resources can share a single IP address quite easily thanks to the Host header.
What about other, non-http services such as IMAP?
Well, we could create another service with ClusterIP type with a different IP address and map a port from there.
But then we would have 1 IP address for http-based services and a separate one for other services.
This doesn’t scale…
Neatly enough, metallb allows services to share IP addresses as long as the following conditions are met:
- IP sharing annotation
metallb.universe.tf/allow-shared-ipis added to both services. - They request the use of different ports (e.g. tcp/80 for one and tcp/443 for the other).
- They both use the Cluster external traffic policy, or they both point to the exact same set of pods (i.e. the pod selectors are identical).
- They both have the same sharing key.
Here is an example service that shares the same IP address of the service of the ingress controller but uses different port:
apiVersion: v1
kind: Service
metadata:
  annotations:
    metallb.universe.tf/allow-shared-ip: shared
  labels:
    app: wireguard
  name: wireguard
  namespace: wireguard
spec:
  type: LoadBalancer
  externalTrafficPolicy: Cluster
  selector:
    app: wireguard
  ports:
  - port: 51820
    protocol: UDP
    targetPort: 51820
Going Forwards
The rest of my infra leverages this foundation which makes deployment of new services quite easy.
Checkout my infra repo - https://github.com/ViktorBarzin/infra - where you can find the terraform modules for the entire thing.
Final words
Let’s see how with this setup we meet our goals in the problem statement:
Design a system that is:
Easily Extensible (easy to add new services)
Adding new services is as easy as deploying them in a new kubernetes namespace. Kubernetes deployment configs are widespread and there is almost no software for which you cannot find or create a kubernetes config.
Further exploration
Currently, all my resources are defined using Terraform resources. Terraform HCL != Kubernetes deployment configs so deploying new services does not automatically make them part of the infrastructure-as-code.
There are tools that translate Kubernetes yamls to terraform resources but further exploration is needed.
Scalable (can handle increase in usage)
This site barely gets 50 visits per day and that’s in a good day. The most vanilla nginx installation would easily handle this amount of traffic but if it we were to increase the traffic by 10x, scaling would be a matter of increasing the replica count.
Further exploration
All of the stateless services can scale horizontally without issues but the stateful ones are a bit trickier. Scaling the mail server deployment, or the privatebin instance which use some form of storage would not be as easy.
Sharding would probably be best but I do not find this area as interesting so I’ll probably not invest too much time in it in the near future.
Highly Available (where the number of single point of failures is close to 0)
Measuring high availability is tricky, especially when there is no traffic and when there are external factors such as ISP outages involved.
From https://status.viktorbarzin.me you can see that the service availability is in the mid to high 90 percentages. Downtime is caused by 2 reasons: 1) ISP outage (which includes power outages) and more commonly 2) Me tinkering with the setup and bringing a service down with faulty configs.
From design point of view, Kubernetes manages available replicas and the setup with the virtual IP address removes node failure as a cause for downtime.
There are some caveats though which are a consequence to the constraints we are working with - namely there are still single points of failure which are inevitable so out best uptime would be at most equal to the uptime of those nodes:
- There is a single entry point to the whole infrastructure which is the border router
- There is a single entry point in the data center infra which is the PFSense appliance (arguably it can be sharded)
- There is a single storage VM which is responsible for all stateful services
- Most obviously, there is a single physical server running everything so any hardware failures would most likely cause down time
Further exploration
1 is a bit tricky to solve due to the power outages. Let’s look at the power supply in the network:
Despite having a UPS battery for the all of the devices I manage, the building level switch does not have any power redundancy and hence when the power goes out, so does internet connectivity to my infrastructure.
Ask my ISP why they don’t use PoE :-)
Another single point of failure is the PfSense VM which is the entry point to all VMs. If that goes down services in all VMs would be unreachable. Could be solved either by exposing all VMs to the upper network (don’t like that) or by having an additional PFSense VM clone which would be in stand by (VMWare HA).
3 is a compromise after long fights with CephFS which proved to cause more problems than it solved for me :/ I will investigate other options such as glusterfs or revisit ceph because having a distributed storage is a much more reliable and scalable solution than having it centralized in a single place.
4 is not solvable as long as there is 1 physical server. Adding an additional server is out of scope for my infra as the electricity bill would double and the benefits would be theoretical. Anyway I do not make any profit whatsoever from this infra so increasing the cost would be unreasonable.
Easily Maintainable (a single person can support it without dedicating a lot of time)
With the current setup of Kubernetes and Terraform, infra is quite easy to maintain and update - I have Drone pipelines for rolling out new images, for periodically rebuilding the Terraform state - so operational cost is quite low.
Further exploration
It would be nice to have the ability to deploy random dockererized project - currently it has to be “converted” to a terraform resource list which is a implementation specific detail of my infra - it would be better to take as input either Dockerfiles or Kubernetes specs.
Moderately Secure
Using the Kubernetes RBAC model gives me the confidence that only certain object can access confidential resources.
Using calico’s NetworkPolicy objects allows to further tighten security.
Further exploration
I have not invested too much in security as everything is build with security in mind. Areas to explore are adding further logging and traffic monitoring - an IDS/IPS would be nice to have within the cluster network.
Reliable
Kubernetes seems to be doing a good job of managing the lifecycle of applications and making sure that enough replicas are alive at any given point. Since most of the infra is build in software, hardware reliability is less of a concern.
Further exploration
There are some glitches happening from time to time causing stuck pods and dead pods appearing as alive. Increasing the number of alerts would help detect and mitigate such issues going forward.
The end
Congrats on reaching the end of this long article, hope you’ve enjoyed reading and learned a few things from my experience.
All of this infra is built with less than 5k of Terraform HCL
╰─$ cloc .
     131 text files.
      85 unique files.
      97 files ignored.

github.com/AlDanial/cloc v 1.88  T=0.03 s (1440.4 files/s, 179221.8 lines/s)
-------------------------------------------------------------------------------
Language                     files          blank        comment           code
-------------------------------------------------------------------------------
HCL                             47            777            673           4398
-------------------------------------------------------------------------------
SUM:                            47            777            673           4398
-------------------------------------------------------------------------------
and it took me nearly a year to get it from scratch to its current state.
Of course, there are a lot of services which did not make it this far, such as CephFS and GlusterFS although I did spend significant amount of time setting them up.
Do checkout my infra repo at https://github.com/ViktorBarzin/infra. I’d be happy if you find this blog post and the repo useful. Do let me know in the comments and see you next time!